Cor Vision vs. Cor Vision Plus: Which Cortizo Sliding Door is Right for Your Project?

The Cortizo Cor Vision series represents the pinnacle of slimline architectural glazing, designed to maximize light and minimize frame. Both the Cor Vision and the Cor Vision Plus offer stunning 20mm–25mm sightlines, but they are engineered to meet fundamentally different project requirements.

Choosing the right system comes down to three key technical factors: size, thermal performance, and automation.

Here is a technical comparison to help you determine which model provides the ideal balance of aesthetics and performance for your build.

Technical Comparison At a Glance

Feature Cortizo Cor Vision (Standard) Cortizo Cor Vision Plus
Interlocking Sightline 20mm 25mm (Slightly thicker for structural integrity)
Max Panel Dimensions (Approx.) 2.5m Wide x 3.0m High 4.0m Wide x 4.0m High
Max Manual Weight Capacity Up to 400 kg Up to 400 kg
Max Motorised Weight Capacity Not available Up to 700 kg (Motorised option only)
Glazing Option Double Glazing (Max 30mm) Double or Triple Glazing (Max 54mm)
Thermal Performance (Typical Uw) Uw Uw
Operational Feature Manual operation only Motorised/Automatic option available

1. The Critical Difference: Size and Weight Capacity

The primary differentiator between the two systems is the sheer scale they can achieve.

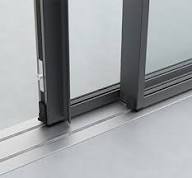
  • Cor Vision (The Minimalist Standard): This system is perfect for projects requiring a standard large opening. Its panels go up to approximately 3 meters high and can handle sashes up to 400 kg. This is more than sufficient for replacing standard patio doors or glazing most new extensions. Crucially, it maintains the absolute slimmest 20mm sightline.

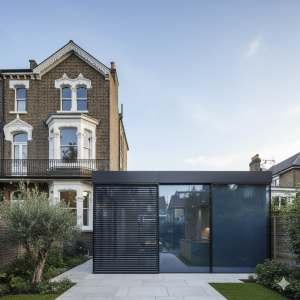
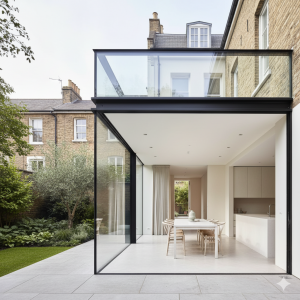
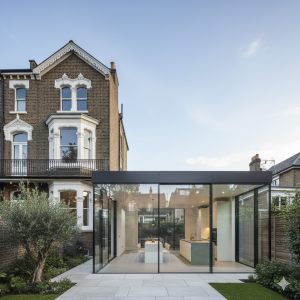
  • Cor Vision Plus (The Oversized Specialist): This is the system for ambitious, grand-scale architecture. It is engineered to handle oversized panels reaching up to 4 meters in height and width—truly replacing an entire wall. To manage this massive scale, the interlock sightline is slightly increased to 25mm, providing the necessary structural strength.

The Verdict on Size:

  • If your design requires the absolute slimmest frame (20mm) and panels up to 3m high, choose Cor Vision.

  • If your vision requires a monumental glass wall up to 4m high and the slight frame increase is acceptable, choose Cor Vision Plus.

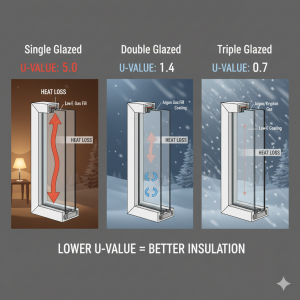
2. Thermal Performance: Double vs. Triple Glazing

The glazing capacity directly impacts a system’s thermal performance (measured by the Uw value).

  • Cor Vision: This model supports double glazing up to 30mm thick. This offers excellent insulation for a slimline system, often achieving Uw values around . This is highly efficient for most UK and European residential projects.

  • Cor Vision Plus: The wider, stronger sash is designed to accommodate triple glazing packages up to 54mm thick. This is key for achieving Passivhaus-level or extremely low-energy performance, with Uw values dropping as low as . This superior insulation also dramatically improves acoustic dampening.

The Verdict on Thermal Performance:

  • For excellent energy performance with a standard budget, Cor Vision is highly effective.

  • For the best possible insulation, superior noise reduction, or where building regulations demand extremely low Uw values, Cor Vision Plus is mandatory.

3. Operation and Automation: Manual vs. Motorised

Moving large glass panels smoothly requires sophisticated engineering, and at the Plus level, automation becomes a necessity.

  • Cor Vision: This is strictly a manual system, engineered for smooth operation up to its 400 kg limit.

  • Cor Vision Plus: While it can be operated manually up to 400 kg, the Plus system is designed with a hidden, high-capacity motorised option to handle panels weighing up to a staggering 700 kg. This feature is ideal for convenience, accessibility, and integrating with modern smart home systems, especially for the largest panels.

The Verdict on Operation:

  • For standard use and manual control, Cor Vision is efficient and simple.

  • For the convenience of automation or for any panel exceeding 400 kg, Cor Vision Plus is the only choice.

Conclusion: Matching the System to the Vision

Both Cortizo systems deliver the ultimate slimline aesthetic. The choice rests entirely on the scale and performancedemands of your project:

Choose Cor Vision if… Choose Cor Vision Plus if…
You need the absolute slimmest frame (20mm). Your panels exceed 3m in height or width.
You only require double glazing. You need the lowest Uw values (triple glazing).
Manual operation is preferred or sufficient. You require the convenience of motorised operation (up to 700 kg).
The project budget is a primary consideration. The project is a high-specification architectural design.

Ready to determine the exact specifications for your build? Contact our technical team to discuss your panel sizes and desired thermal ratings to ensure you select the perfect Cortizo system.

The Engineering of Effortless Operation: What Makes a High-End Sliding Door Slide So Smoothly?

The most striking feature of a slimline sliding door system like the Cortizo Cor Vision is the sheer scale of the glass. These panels can be massive—often hundreds of kilograms each—yet they glide open with a mere touch, feeling almost weightless.

This effortless operation is not magic; it’s a direct result of meticulous engineering focused on three critical, often-unseen components: the rollers, the track, and the structural design.

Here is a deep dive into the hidden mechanics that ensure a large glass wall moves with the precision of a Swiss watch.


1. The Foundation: High-Performance Roller Assemblies

The roller system is the heart of the smooth operation. In a high-end slider, these are not simply small wheels; they are complex, multi-component assemblies designed to handle tremendous loads.

  • Load-Bearing Capacity: High-end rollers are precision-engineered to accommodate heavy weights, often rated to safely support panels of 300 kg, 400 kg, or more. They use durable materials, typically stainless steel or high-grade polymers, to prevent deformation or wear over time.

  • Tandem Roller Design: Many top-tier systems use tandem rollers—multiple wheels per assembly—to distribute the panel’s weight evenly across the track. This prevents any single point from bearing excessive stress, ensuring longevity and consistent movement.

  • Precision Bearings: The secret to the gliding motion lies in the bearings. Premium rollers feature precision ball bearings (often sealed for protection against dust and moisture). These components significantly reduce friction, allowing the massive panel to be moved with minimal force.

2. The Path: The Track System and Drainage

The track is the crucial path the rollers follow. A low-quality track will quickly lead to sticking, grinding, and failure. A premium system is designed for both precision and maintenance.

  • Corrosion-Resistant Materials: Since sliding tracks are often exposed to moisture, they must be highly resistant to corrosion. Tracks are typically constructed from hardened stainless steel or robust aluminium.

  • Recessed and Flush Design: For a seamless aesthetic, modern tracks are often installed flush with the interior floor. This requires a sophisticated design that still manages water. High-end systems include integrated drainage channels to efficiently divert rainwater away, preventing standing water that could compromise the rollers or the surrounding floor structure.

  • Self-Centering and Alignment: The track profile is designed to ensure the rollers remain perfectly centred. This precise guidance prevents any side-to-side wobble or rubbing, which is critical for maintaining the tight seals and the door’s effortless feel.

3. Structural Rigidity and Panel Guidance

The structural integrity of the frame and the glass panel itself plays a vital role in smooth operation.

  • Non-Flexing Profiles: When a large, heavy panel is pushed or pulled, the aluminium profile must not flex or twist. High-quality systems use engineered, multi-chambered profiles that provide exceptional rigidity. Flexing would cause the panel to bind in the track, instantly ruining the “effortless” experience.

  • Integrated Handling: The handles themselves are part of the engineering solution. Systems like the Cor Vision often feature a streamlined, integrated handle mechanism. This design ensures that the force exerted by the user is applied directly and optimally to initiate movement, rather than being applied to an external handle that might twist the frame slightly.

  • Precision Manufacturing Tolerances: High-end door manufacturers work within exceptionally tight manufacturing tolerances. This ensures that every panel is perfectly square, every roller housing is precisely aligned, and the gap between the interlock profiles is exact (e.g., the 20mm sightline). This precision guarantees that when the panel moves, it follows a true, straight line.


The Result: A Door That Glides

When premium components—low-friction tandem rollers, corrosion-resistant flush tracks, and highly rigid aluminium profiles—are precision-engineered together, the result is the ultimate user experience.

The door doesn’t slide; it glides. It’s a testament to the fact that in architectural glazing, the unseen engineering details are often the most important features, providing you with years of beautiful, maintenance-friendly, and truly effortless operation.


Planning your next glazed opening? Let us walk you through the technical specifications and operational feel of our high-end sliding door systems.

Beyond the Bifold: Why Slimline Sliding Doors are Redefining Contemporary Design

For years, the bifold door was the undisputed king of patio glazing, promising to open up an entire wall and bring the outside in. They offered a dramatic, accordion-style solution that captured the imagination of many homeowners.

However, a quiet revolution has been happening in architectural glazing. With advancements in engineering, slimline sliding doors are making a powerful resurgence, providing a superior solution for the modern, minimalist aesthetic.

The key to this comeback lies in one crucial difference: the frame.


The Fundamental Design Shift: View vs. Opening

The choice between a sliding door (like the Cortizo Cor Vision) and a bifold essentially comes down to two design priorities:

  1. Maximum Uninterrupted View (Sliding Doors): Prioritising minimal frame and maximum glass, both when the doors are closed and when they are partially open.

  2. Maximum Unobstructed Opening (Bifold Doors): Prioritising removing the entire wall of glass when the doors are fully retracted.

While bifolds offer a full opening, the contemporary focus has shifted overwhelmingly to achieving the perfect, uncompromised view.

1. The Power of the Slim Profile: Less Frame, More Light

The most compelling argument for a modern slider is its ability to almost disappear.

Feature Slimline Sliding Doors (e.g., Cor Vision) Traditional Bifold Doors
Interlocking Sightline As little as 20mm Typically 80mm – 150mm
Glass-to-Frame Ratio Extremely high (up to 94% glass surface area) Lower, due to multiple vertical dividing lines
Visual When Closed Near-seamless glass wall; view takes centre stage. Multiple vertical aluminium lines break up the view.

A system with a 20mm sightline creates a breathtaking, almost frameless aesthetic. When closed, it feels less like a door and more like a permanent glass wall, allowing natural light to flood the space with minimal visual obstruction. This is the ultimate expression of minimalism.

2. Space Efficiency & Effortless Operation

The mechanism of a sliding door resolves key challenges posed by bifolds, making it more practical for daily use and smaller spaces.

  • No Stacking Required: Bifold doors require a significant amount of stacking space, whether inside or outside, to accommodate the folded panels. This can interrupt patio furniture layouts or internal traffic flow. Sliding doors, in contrast, glide parallel to the wall, requiring zero additional space for operation. This makes them ideal for balconies, smaller gardens, or rooms where space is at a premium.

  • Simple, Controlled Access: Opening a bifold requires engaging and folding multiple panels and locks. A slimline slider requires one simple movement. For quick access to the garden or for letting in a breath of air, a sliding panel offers far better control—you can open it by just a few inches or fully.

3. Achieving a True Flush Finish

Contemporary design is defined by seamless transitions. Modern sliding systems excel at achieving a completely flush floor level.

The track of many high-end sliding doors can be recessed into the floor structure, allowing the internal floor finish (like tiles or wood) to run level with the external patio or decking. This barrier-free threshold dramatically blurs the line between your living room and the exterior, creating that highly sought-after indoor-outdoor connection without a step or lip.

Where Does a Slimline Slider Work Best?

While bifolds still have their place when a 100% clear opening is paramount (e.g., in a restaurant or large entertainment space), a slimline slider is the superior choice for most contemporary residential projects:

  • Where the View is King: Coastal properties, homes overlooking a beautiful garden, or any space where the view is the primary design feature.

  • Where Space is Limited: Smaller extensions, rooms leading onto a balcony, or narrow patios where a bifold stack would be intrusive.

  • The Minimalist Aesthetic: For homeowners and architects aiming for an uncluttered, modern, and clean look defined by sharp lines and large glass planes.

  • Cornerless Designs: Ultra-slim systems allow for open corner installations where two glass walls meet and slide away, eliminating the need for a fixed corner post.

The return of the sliding door, spearheaded by ultra-slim systems, is a testament to the fact that sometimes, less is truly more. By eliminating the bulk, contemporary sliders have reclaimed their position as the definitive choice for sophisticated, light-filled architecture.


Are you renovating or building a new extension? We can help you compare the specific slimline systems available to ensure you choose the perfect door for your design vision.

The Power of the 20mm Sightline: How Slimline Doors Revolutionize Your View

In modern architecture, the goal is often to dissolve the barrier between inside and out. It’s about more than just light; it’s about experience. For decades, the frame has been the necessary evil—a bulky structure interrupting the view.

But thanks to ultra-slim systems like the Cortizo Cor Vision, that paradigm is shifting. The secret weapon? An astonishingly slender 20mm sightline.

Here is how this tiny detail is making a massive difference in contemporary design.


1. The Optical Illusion: Creating the “Invisible Wall”

The most immediate and stunning impact of a 20mm sightline is its near-invisibility.

  • Maximum Glass, Minimum Frame: A 20mm profile is roughly the width of a standard smartphone. When you compare this to the 80mm–100mm frame of a traditional patio door, the difference is stark. The frame effectively disappears when viewed from a distance or on an angle.

  • A Painter’s Canvas: By minimizing the vertical obstruction, the frame no longer acts as a series of heavy vertical lines. Instead, it becomes a subtle boundary for the expansive glass, treating the outdoor landscape as a piece of constantly changing, living art. The view takes center stage, uninhibited.

2. Flooding Your Space with Natural Light

While large glass panels are the starting point for maximizing light, the 20mm sightline is the crucial element that ensures no light is lost.

In any glazed system, the amount of natural light entering your home is determined by the Glass-to-Frame Ratio.

  • A Higher Ratio = Brighter Rooms: With an ultra-slim frame, you achieve a higher glass-to-frame ratio. This means your doors bring in significantly more daylight compared to systems with thicker profiles, even if the overall aperture size is the same.

  • The Psychological Lift: This abundance of natural light is known to enhance mood, productivity, and overall well-being. It reduces reliance on artificial lighting during the day, creating brighter, more welcoming, and more energy-efficient spaces.

3. The Seamless Transition: Dissolving the Barrier

The revolution isn’t just about what the doors look like when they’re closed; it’s about what they enable when they’re open. The 20mm sightline works in tandem with other modern features to create a truly seamless transition.

Feature Design Impact
Slim Sightline Makes the structural division disappear, maximizing the open passage.
Flush Track Option Eliminates the raised sill, allowing flooring (like tile or decking) to flow continuously from inside to outside.
Integrated Handle Removes any protruding hardware, ensuring the door remains a flat, elegant surface.

When these elements combine, the door physically and visually vanishes when slid open. The line between your kitchen and your terrace, or your living room and your garden, is dissolved, creating a singular, unified living area. This is the essence of Indoor-Outdoor Living.

4. Architectural Freedom

For architects and designers, the 20mm sightline offers unprecedented freedom:

  • Cornerless Designs: Ultra-slim systems allow for open-corner configurations, where two large glass walls meet and slide away entirely, leaving a post-free, floating corner. The sightline is the only visible element, maintaining structural integrity without compromising the open-air effect.

  • Grand Scale: Because these systems are engineered to carry enormous panes of glass (often up to 400kg or more), the focus shifts from the framework to the sheer scale of the glazing itself. This allows for breathtaking, floor-to-ceiling glass walls.

Conclusion: A Small Detail, A Giant Leap

The 20mm sightline is a triumph of engineering and minimalism. It’s a testament to the idea that sometimes, the best design is the one you barely notice. By stripping the frame back to its absolute functional minimum, slimline sliding doors don’t just provide a view—they create a total sensory experience, fundamentally altering how we connect with the space around us.


Interested in exploring how ultra-slim doors could transform your next architectural project? We can discuss specific configurations, thermal performance, and customization options!

Architectural Considerations When Planning Your Modern Glazed Extension

Modern glazed extensions have become incredibly popular, and it’s easy to see why. They flood your home with natural light, create a seamless connection with your garden, and add a contemporary flair that can completely transform your living space. However, achieving that stunning, light-filled outcome requires careful architectural consideration. It’s not just about slapping some glass onto the back of your house!

Here are some key architectural aspects to ponder when planning your own modern glazed extension:


1. Integration with Existing Architecture: Harmony vs. Contrast


One of the first decisions is how your new extension will relate to your existing home. Do you want it to blend in seamlessly, almost as if it’s always been there, or do you prefer a striking contrast that highlights its modern design?

  • Harmonious Integration: This often involves matching materials, rooflines, and window styles of the existing property. For example, if your home has brickwork, you might consider brick elements in your extension, or if your windows have a specific frame color, carrying that through.


  • Striking Contrast: This approach allows the extension to stand out as a distinct, contemporary addition. This often works well with period properties, where the juxtaposition of old and new can be visually captivating. Think sleek glass and steel against an ornate Victorian facade.


It’s important to consider sightlines from inside and outside your home to ensure the addition enhances, rather than detracts from, your property’s overall aesthetic.


2. Maximizing Natural Light and Views


The primary appeal of a glazed extension is light and connection to the outdoors. Architects are experts in harnessing these elements.

  • Orientation: The direction your extension faces significantly impacts light levels and potential for overheating. South-facing extensions will get the most sun, but may require solar control measures. North-facing extensions offer consistent, diffused light, ideal for studios or offices.
  • Glazing Ratios and Frame Thickness: Modern designs often favor minimal frames to maximize the glass area. Consider slim-profile aluminum or steel frames. Large panes of glass, floor-to-ceiling windows, and even glass roofs can dramatically increase light ingress.


  • Connecting to the Garden: Bi-fold, sliding, or pivot doors can completely open up an entire wall, blurring the lines between indoor and outdoor living. Consider how the internal floor level aligns with your patio or decking for a seamless transition.


3. Thermal Performance and Solar Control


A common misconception is that glazed extensions are always cold in winter and too hot in summer. Modern architectural glazing has come a long way!

  • High-Performance Glazing: Look for double or triple glazing with low-emissivity (low-e) coatings and argon or krypton gas fills. These dramatically improve insulation, keeping heat in during winter and out during summer.
  • Solar Shading: To prevent overheating in sunny extensions, integrate solar shading. This could include external brise-soleil (fixed or adjustable fins), recessed glazing, overhanging eaves, or internal blinds and curtains. Smart glass that can tint automatically is also an option.


  • Ventilation: Good cross-ventilation is crucial. Strategically placed openable windows or rooflights can create a natural airflow, helping to cool the space on warmer days.


4. Structural Considerations and Detailing


Large expanses of glass require careful structural planning.

  • Supporting the Glazing: Modern designs often feature minimal visible structure. This means working with structural engineers to integrate discreet steel frames or clever cantilevered sections that support heavy glass units.
  • Drainage and Weatherproofing: Proper detailing around glass panels, doors, and roof junctions is critical to prevent leaks and ensure longevity. This is where a good architect and experienced builder make all the difference.
  • Thermal Bridging: Where different materials meet (e.g., glass and steel), care must be taken to prevent “thermal bridges” which can cause heat loss and condensation. High-quality thermal breaks are essential.


5. Internal Layout and Flow


An extension shouldn’t feel like an add-on; it should enhance the internal flow of your home.

  • Open Plan vs. Defined Zones: Will your extension be a completely open-plan kitchen-diner-living space, or will you create more defined zones within it? Furniture placement, changes in ceiling height, or different flooring materials can subtly delineate areas.
  • Connection to Existing Rooms: Consider how the new space connects to the rooms it adjoins. Will you knock down walls to create a larger open space, or maintain some separation?
  • Functionality: What will be the primary use of the extension? A kitchen needs different considerations than a living room or a home office.


Conclusion


A modern glazed extension is a significant investment that can dramatically improve your home and lifestyle. By carefully considering these architectural points and working with an experienced architect, you can ensure your new space is not only beautiful but also highly functional, comfortable, and sustainable for years to come.

Your 2026 Smart Lighting Guide for Extensions and Orangeries

A conservatory or orangery is a gateway between your home and your garden, and its lighting needs to be as adaptable as the space itself. By 2026, smart lighting is moving beyond simple on/off control to focus on wellness, personalization, and efficiency.

Here is your guide to the best practices and new technologies that will illuminate your new extension perfectly.


New Technologies for 2026


The next generation of smart lighting focuses on making the experience seamless, healthy, and hyper-efficient.


1. Human-Centric Lighting (HCL) & Wellness


This is the most significant trend. HCL systems automatically adjust the light’s colour temperature (measured in Kelvin) and intensity throughout the day to support your body’s natural circadian rhythm.

  • Morning/Daytime: Crisp, cooler white light (4000K-5000K) to boost alertness and productivity.
  • Evening: Warm, golden light (2700K-3000K) to signal to your body that it’s time to relax and prepare for sleep.

Tip: Look for systems that are truly “tuneable white,” allowing for smooth transitions between warm and cool colours. This creates a natural feel that complements the outdoor light filtering through your extension.


2. Advanced AI and Machine Learning


Smart home ecosystems are becoming more intelligent, moving from reactive control to predictive automation.

  • Anticipatory Scenes: Your lighting system will learn your habits—for instance, if you usually read in the orangery at 7 PM, the system will start to dim the ambient lights and gently bring on the task lamp in your preferred reading spot before you even enter the room.
  • Weather and Daylight Integration: The system will use online weather data and local light sensors to adjust interior brightness to maintain a consistent, comfortable light level, regardless of a sudden cloudburst.


3. Ultra-Efficient LED Technology and Sustainability


LEDs are already efficient, but 2026 introduces even greener, longer-lasting products.

  • High-Efficiency Engines: Expect LEDs to deliver the same or higher light output while consuming less power, making your energy savings even greater.
  • Modular Fixture Design: Manufacturers are increasingly using modular parts, allowing for easier, more sustainable repairs and upgrades without replacing the entire fixture, reducing waste.


Smart Lighting Best Practices for Your Extension


When designing your smart lighting scheme, consider the unique challenges of an extension or orangery: primarily the high amount of glass and the structural constraints of the roof.


1. Plan for Connectivity and Power


  • Robust Wi-Fi/Mesh Network: Smart lighting relies on a stable connection (Zigbee, Z-Wave, or Wi-Fi). Ensure your extension is fully covered by a strong mesh Wi-Fi system to prevent connectivity dropouts.
  • Wired vs. Wireless: Wireless control (like Casambi or Philips Hue) is excellent for flexibility, especially in retrofit applications. However, for a new build or a major renovation, consider hard-wiring your smart switches and controllers for the most reliable performance and seamless look.


2. Maximise Architectural Focus


  • Discreet Integration: Use LED strip lighting (often dimmable and colour-changing) to graze the ceiling coving, highlight the perimeter where the solid wall meets the glass roof, or run along the base of large glass doors. This keeps the light sources hidden while emphasizing the structure.
  • Modern Central Feature: For a contemporary look, a sleek linear pendant over a dining or seating area offers a strong focal point and provides excellent task lighting without the traditional look of a chandelier.


3. Go Beyond the Bulb


  • Smart Switches and Dimmers: Installing smart wall switches, even if you don’t use smart bulbs, can provide simple, elegant control over entire circuits. This allows non-tech-savvy guests to use the lights easily and is crucial for creating master-off switches for when you leave the house.
  • Security Integration: Connect your extension’s lighting to your security system. Program a “Holiday Mode” to randomly turn lights on and off to mimic occupancy, or use motion-sensor integration for a security boost at night.

By embracing these layered techniques and new technologies, your orangery or extension will transform into a truly intuitive, beautiful, and adaptable space, perfectly illuminated for every moment of the day, all the way into 2026 and beyond.

A Look Ahead: What the 2026 Regulations Mean for Glass Doors and Skylights

The UK is moving fast towards its Net Zero carbon targets, and the construction industry is at the forefront of this change. While the Future Homes Standard (FHS) is often cited with a 2025/2026 implementation date, the key changes that will affect glass doors and skylights have been steadily tightening since the 2022 Part L update. The full rollout of the FHS will dramatically enforce these standards, making thermal performance non-negotiable for all new builds and setting a high bar for renovations.

Here is a breakdown of the critical changes focusing on thermal performance, solar control, and ventilation for glazed elements.


1. Thermal Performance: The U-Value Tightens


The most significant change is the enforcement of lower U-values, which measure the rate of heat loss through a component (Watts per square metre per Kelvin, or ). The lower the U-value, the better the insulation.


New-Build Properties (Under the Future Homes Standard):


The drive is towards a zero-carbon-ready home. The final FHS U-value figures for new dwellings are highly stringent, essentially making high-performance double glazing a minimum and triple glazing a strong contender for compliance and future-proofing.

Element Current 2022 Part L Maximum U-Value Future Homes Standard (FHS) Target U-Value (Approx.)
Windows & Glazed Doors or lower
Roof Windows (Vertical) Likely to remain or lower
Rooflights/Skylights (Horizontal) Likely to remain or lower

Key Insight: To achieve the overall performance target of the Future Homes Standard, many builders will find it necessary to specify windows and doors that beat the minimum U-value, potentially pushing many specifications towards triple-glazed units to offset other design features.


Existing Properties (Replacements and Renovations):


While new builds face the strictest standards, replacements in existing homes will also need to meet enhanced Part L requirements, which are already tougher than pre-2022.

  • Replacement Windows/Glazed Doors: A maximum U-value of .
  • Replacement Rooflights/Skylights: A maximum U-value of .


2. Overheating Control (Approved Document O)


As homes become highly insulated and airtight, the risk of overheating from solar gain becomes a major concern—especially with large expanses of glass.

The new regulations, enforced via Approved Document O, mandate measures to control solar gain. This directly affects the specification and design of large glass doors (like bi-folds and sliding doors) and skylights, particularly on south and west-facing elevations.

  • Solar Control Glazing (Low g-value): Glazing units must be specified with a lower ‘g-value’ (Solar Heat Gain Coefficient), which limits the amount of solar heat entering the building.
  • Shading Devices: The regulations promote the use of external shading strategies to prevent heat from reaching the glass in the first place. This includes:
    • Overhangs and Canopies
    • External Blinds or Shutters
    • Louvres or Brise Soleil

Action Point: Designers must now consider the orientation and size of glazed areas in conjunction with shading solutions to ensure the dwelling does not overheat. This is a crucial design shift for modern homes that favour large glass facades.


3. Ventilation Requirements (Approved Document F)


The superior airtightness required to meet the lower U-values means relying on natural air leakage for ventilation is no longer an option.

  • Mandatory Trickle Vents: When replacing or installing new windows and glass doors in habitable rooms, trickle vents are now generally required by Part F to ensure continuous background ventilation. This is critical for maintaining indoor air quality and preventing condensation and mould.
  • MVHR Systems: For high-performance new builds, Mechanical Ventilation with Heat Recovery (MVHR)systems are often specified. These systems use the high level of airtightness to their advantage, exchanging stale indoor air with fresh outdoor air while recovering heat.


Summary for Professionals and Homeowners


The 2026 landscape is defined by the Future Homes Standard and its underlying principle of “fabric first.” For glass doors and skylights, this means:

  1. Triple Glazing is the New Gold Standard: While high-performance double glazing may still meet the minimum for some areas, specifying a triple-glazed system offers the best path to effortless compliance and a genuinely future-proofed, comfortable home.
  2. Design for Comfort: Compliance now involves balancing heat loss (U-value) with heat gain (g-value) and ventilation (Part F/MVHR). Large glazed areas require a comprehensive solar control strategy.
  3. Whole-System Approach: The focus is on the thermal performance of the entire assembly—the glass, the frame (including its thermal break), the seals, and the installation details (thermal bridging). Photographic evidence of the installation at critical junctions will be a part of the compliance process.

The era of simply fitting a low-cost, standard-specification glass product is ending. The new regulations demand integrated, high-performance glazing solutions as a critical component of a sustainable, energy-efficient UK home.

The Clear View: Understanding Heat Loss and Glazing Technical Specifications:

Windows are essential for light and views, but they can be a major weak point in a building’s thermal envelope,allowing precious heat to escape in winter and unwanted heat to pour in during summer. Understanding how heat loss works and the technical specifications of modern glazing is key to creating a comfortable, energy-efficient space.

This blog post breaks down the science of heat transfer and compares the technical merits of single, double, and triple glazing.


Understanding Heat Loss and Heat Transfer


Heat always moves from a warmer area to a cooler area—it’s a fundamental law of physics. Through a window, this transfer occurs in three primary ways:


1. Conduction


  • What it is: The transfer of heat through direct contact within a material. In a window, heat from your warm interior air hits the glass, and the thermal energy vibrates through the glass pane itself to the cooler exterior surface.
  • Glazing Factor: Glass is a decent conductor, meaning it easily passes heat. In single glazing, conduction is a major heat loss pathway.


2. Convection


  • What it is: The transfer of heat through the movement of fluids (like air or gas). Warm air next to the inside pane of glass rises, is cooled by the glass, and then falls, creating a circulating current that draws heat from the room and delivers it to the cold inner pane.
  • Glazing Factor: This is where the gap in multi-pane glazing comes in. The sealed space between panes prevents large-scale air movement, significantly reducing heat transfer by convection.


3. Radiation


  • What it is: The transfer of heat via electromagnetic waves, particularly in the infrared spectrum. Everything warm radiates heat. Your interior walls, furniture, and body radiate heat, and a portion of this energy passes directly through the glass to the outside.
  • Glazing Factor: This is often the largest source of heat loss in a standard window. Modern innovations like Low-Emissivity (Low-E) coatings are designed to address this by reflecting the long-wave infrared heat back into the room while still allowing visible light to pass through.

Here’s an illustration of these heat transfer methods:


The Key Technical Metric: The U-Value


To quantify a window’s thermal performance, we use the U-value (also known as the coefficient of heat transmission).

  • What it is: The rate of heat loss through a structure (like a window) per unit area for every degree of temperature difference between the inside and outside.
  • Unit: Watts per square meter Kelvin ().
  • The Goal: A lower U-value means better insulation and less heat loss, leading to greater energy efficiency and lower heating bills.


Glazing Technical Specifications Compared


The number of glass panes and the contents of the gap between them fundamentally change a window’s U-value and overall efficiency.

Glazing Type Structure Typical U-value () Key Technical Factors Performance Summary
Single Glazed One pane of glass. No thermal barrier, high conduction. Very Poor insulation. High heat loss, prone to condensation.
Double Glazed Two panes of glass separated by an air or gas-filled cavity. (Modern Low-E/Argon) Sealed cavity reduces convection and conduction. Low-E coating on one internal surface reduces radiation. Often Argon gas-filled. Good insulation. The standard for modern homes, offering a significant reduction in heat loss (up to 50% vs. single glazing).
Triple Glazed Three panes of glass with two sealed cavities. (Modern Low-E/Argon or Krypton) Two separate insulating cavities provide a substantial thermal break. Often uses Low-E coatings on two surfaces and gas fill (Argon or higher-performing Krypton). Excellent insulation. Ideal for very cold climates or passive house standards, offering maximum heat retention.

Here’s a visual comparison of single, double, and triple glazing:


Key Technical Enhancements in Modern Glazing:


  1. Insulating Gas Fills: Argon vs. KryptonReplacing the air in the sealed cavity with an inert gas significantly improves thermal performance, primarily by reducing convective and conductive heat transfer.
    • Argon Gas:
      • Properties: Argon is a non-toxic, odorless, clear, inert gas that is denser than air. It’s relatively inexpensive and readily available.
      • Performance: Due to its higher density and lower thermal conductivity compared to air, Argon slows down the movement of heat within the window’s cavity. This dramatically reduces convection currents and conduction.
      • Application: It’s the most common gas fill for both double and triple glazed units, especially in standard cavity widths (typically 12mm-16mm).
    • Krypton Gas:
      • Properties: Krypton is also an inert, non-toxic, clear, odorless gas, but it is much denser than Argon and significantly more expensive.
      • Performance: Its superior density and even lower thermal conductivity make it an even better insulator than Argon.
      • Application: Krypton is particularly effective in smaller cavity widths (e.g., 6mm-10mm), where Argon’s effectiveness might be limited due to its molecular size. This makes it ideal for triple glazed units where space between panes might be tighter or for achieving extremely low U-values in compact designs.
      • Cost vs. Benefit: While more expensive, Krypton allows for thinner, lighter, and sometimes more aesthetically pleasing window units that still achieve superior thermal performance. It’s often used in high-performance windows, passive house designs, or when specific U-value targets must be met in limited space.

    In essence, the denser the gas, the slower heat can move through it, leading to better insulation.

  2. Low-Emissivity (Low-E) Coatings: A Deeper DiveLow-E coatings are the unsung heroes of modern window technology, specifically tackling radiant heat transfer.
    • What it is: An incredibly thin, virtually invisible metallic oxide layer applied to one or more glass surfaces within the insulated glass unit (IGU).
    • How it Works (The Science):
      • Emissivity: All materials absorb and radiate heat. Emissivity is a measure of how well a material radiates energy. Standard clear glass has high emissivity, meaning it readily radiates absorbed heat.Low-E coatings, as their name suggests, have low emissivity.
      • Reflection vs. Absorption: Low-E coatings are designed to reflect long-wave infrared (IR) radiation (heat) while allowing most visible light to pass through.
        • In Winter: The coating reflects internal heat back into the room, preventing it from escaping outside.
        • In Summer: The coating reflects external heat (from the sun’s warm rays) away from the building, preventing it from entering and overheating the space.
    • Types of Low-E Coatings:
      • Hard Coat (Pyrolytic): Applied during the manufacturing process of the glass (on-line), fusing a thin metallic oxide layer to the glass. It’s very durable but generally has slightly higher emissivity (meaning it’s slightly less efficient) than soft coats.
      • Soft Coat (Sputtered): Applied in an off-line process in a vacuum chamber. These coatings are typically multi-layered and provide superior performance (lower emissivity). However, they are more delicate and must be protected within the sealed unit. Most high-performance windows use soft-coat Low-E.
    • Placement Matters: The specific surface within the IGU where the Low-E coating is applied depends on the climate and desired performance (e.g., passive solar gain vs. solar control). Common placements include surface #2 (facing the cavity from the inside pane) or surface #3 (facing the cavity from the outside pane of a double-glazed unit).

    Here’s an illustration showing how Low-E coatings work:


  1. Warm Edge Spacers: The material separating the glass panes around the edge. Using materials like foam or composite instead of highly conductive aluminum minimizes heat loss at the perimeter of the unit. This improves the overall U-value and reduces the risk of condensation forming at the edge of the glass.


Making the Right Glazing Choice


Choosing your glazing is a balance of performance, cost, and climate.

  • For the Majority of Homes (Standard UK/Temperate Climate): Modern Double Glazing with Low-E coating and Argon gas offers the best balance of cost and performance. The jump in efficiency from single to double glazing is monumental.
  • For Extreme Cold or Passive House Builds: Triple Glazing provides superior thermal performance, achieving a U-value that often rivals an insulated wall. The increased initial cost is offset by maximum long-term energy savings.
  • Single Glazing: Now considered obsolete for habitable rooms due to its catastrophic heat loss. It rarely meets modern building regulations.

In conclusion, the days of relying on a single sheet of glass are long over. By understanding the three mechanisms of heat transfer and specifying a low U-value using multi-pane units, inert gas fills (Argon for most, Krypton for high-performance in tight spaces), and Low-E coatings, you can transform your windows from energy liabilities into energy-saving assets.

Keeping Your Orangery Warm This Winter: A Guide to Cost-Effective Heating

As the days shorten and the chill sets in, your orangery, a beautiful extension of your home and a sanctuary for plants, can quickly lose its inviting warmth. Maintaining a comfortable temperature, especially for delicate exotic plants, becomes a priority. But how do you do this without sending your energy bills through the roof? This extended blog post will delve into various cost-effective strategies for keeping your orangery warm this winter.


Understanding Heat Loss in Orangeries


Before we discuss solutions, it’s crucial to understand why orangeries can be difficult to heat. Their expansive glass surfaces, while offering stunning views and light, are also major culprits for heat loss. Glass has a lower insulation value compared to solid walls, meaning heat escapes more readily. Additionally, drafts from ill-fitting doors or vents can contribute significantly to a colder environment.


Step 1: Maximize Natural Heat Gain


The cheapest heat is the heat you don’t have to pay for. Harnessing the sun’s power, even in winter, can make a surprising difference.

  • Clean Your Glass: Dust and grime on your orangery’s glass panels can reduce the amount of sunlight entering. A good clean will allow more solar radiation to penetrate and warm the space during the day.
  • Strategic Plant Placement: If you have deciduous trees or shrubs outside your orangery, ensure they are pruned to allow maximum sunlight in during the winter months. In summer, they can provide welcome shade, but in winter, you want all the light you can get.
  • Thermal Mass: Consider incorporating elements with high thermal mass, such as dark-colored tiles or stone, within your orangery. These materials absorb heat during the day and slowly release it as the temperature drops in the evening. Water barrels painted black can also serve a similar purpose, absorbing solar energy and radiating it slowly.


Step 2: Seal Up Drafts and Improve Insulation


Preventing heat from escaping is often more cost-effective than generating more heat.

  • Check Doors and Windows: Inspect all doors and windows for gaps. Weatherstripping and door sweeps are inexpensive solutions that can make a significant impact on preventing drafts.
  • Glazing Upgrades (Long-Term Investment): If your budget allows for a more significant investment, upgrading to double or even triple glazing will dramatically improve insulation. Low-E (low-emissivity) glass is particularly effective as it reflects heat back into the orangery. While this is an initial outlay, it leads to substantial long-term savings on heating costs.
  • Bubble Wrap Insulation (DIY and Temporary): For a very low-cost, temporary solution, you can line your orangery’s glass panels with large bubble wrap. Simply spray the glass with water, and the bubble wrap will adhere. This creates an insulating layer of air. While it might slightly obscure the view, it’s surprisingly effective for plants and can be easily removed in spring.
  • Thermal Blinds or Curtains: Installing thermal blinds or heavy curtains on your orangery windows and doors can provide a significant insulating barrier at night when temperatures drop the most. Close them at dusk to trap the day’s warmth and open them in the morning to let the sun in.


Step 3: Efficient Heating Solutions (When Natural Heat Isn’t Enough)


Even with the best insulation, you may still need a supplementary heating source. Here are some cost-effective options:

  • Electric Fan Heaters (Small Spaces/Emergency): For very small orangeries or for occasional boosts of heat during exceptionally cold spells, a small electric fan heater can be useful. However, they are generally not energy-efficient for continuous heating of larger spaces due to the high cost of electricity. Look for models with thermostats to prevent overheating and wasted energy.
  • Electric Tube Heaters: These low-wattage heaters provide gentle, continuous background heat. They are ideal for maintaining a consistent minimum temperature without using a lot of electricity. They are particularly good for preventing frost in plant-heavy orangeries.
  • Paraffin Heaters (Ventilation is Key!): Paraffin heaters are a traditional and relatively inexpensive way to heat a small to medium-sized orangery. They don’t require electricity, which can be an advantage. However, they produce moisture and fumes, so good ventilation is absolutely essential to prevent dampness and ensure air quality. Only use them in well-ventilated spaces and ensure you have a carbon monoxide detector.
  • Propane Heaters (Similar to Paraffin): Similar to paraffin heaters, propane heaters offer a powerful heat source without electricity. Again, adequate ventilation is critical due to combustion byproducts.
  • Infrared Heaters: Infrared heaters directly warm objects and people, rather than the air. This can be more efficient in a space like an orangery where much of the heated air would quickly escape. They are also silent and provide a comfortable, radiant warmth.
  • Air Source Heat Pumps (Higher Initial Cost, Long-Term Savings): For larger orangeries or those you intend to keep consistently warm, an air source heat pump is a highly efficient, albeit more expensive, option. They extract heat from the outside air, even in cold temperatures, and transfer it into your orangery. The initial investment is higher, but the running costs are significantly lower than electric resistance heaters.


Step 4: Smart Heating and Monitoring


Even the most efficient heating system can waste energy if not managed properly.

  • Thermostats and Timers: Crucial for any heating system. A thermostat will switch the heater off once the desired temperature is reached, preventing unnecessary energy consumption. Timers allow you to heat the orangery only when needed, for example, maintaining a minimum temperature overnight for plants, or warming it for your morning coffee.
  • Hygrometers/Thermometers: Monitor the temperature and humidity levels within your orangery. This will help you understand how your heating solutions are performing and allow you to make adjustments. Different plants have different temperature and humidity requirements, so knowing these values is vital.
  • Target Temperature: Don’t aim for tropical conditions unless absolutely necessary for your specific plants. Often, just keeping the temperature above freezing (around 5-7°C or 41-45°F) is sufficient for many overwintering plants, which will significantly reduce heating costs.